
File Information
| File | Details |
|---|---|
| Name | LibreChat |
| Version | Latest (Stable) |
| Format | .zip |
| License | MIT |
| Platform | Windows, macOS, Linux |
| UI Type | Web UI (accessible via browser) |
| Size | 300MB (may vary by build) |
Table of contents
Description
LibreChat is a game-changer in the world of AI chat interfaces. Designed with inspiration from OpenAI’s ChatGPT and supercharged with cutting-edge enhancements, LibreChat offers a modern, clean & highly customizable interface to run your own LLMs. Whether you’re a developer, researcher, or just someone who wants full control over their AI assistant experience. LibreChat gives you everything you need, without the need for third-party subscriptions or cloud lock-in.
Unlike other platforms, LibreChat is completely open source and community-powered. It supports a wide range of models — from cloud-based APIs like OpenAI, Claude, or Gemini, to fully local options like Ollama, LM Studio & even your own private GPT OSS instances.
The beauty of LibreChat lies in its flexibility. You can run it locally or deploy it on a private server, rebrand it entirely, build your own agents, integrate advanced tools, or simply use it as a personal assistant. With support for voice chat, multimodal inputs, image generation, markdown, conversation forking, file uploads, web search and much more, it’s truly one of the most powerful chat interfaces available today. It comes with the benefits of following:
- Fully rebrandable: Customize logo, UI, name & links
- Own your data: Nothing is sent to external servers
- All-in-one hub: Use multiple models in one UI
- Model flexibility: From OpenAI to local GGUF files
- Multi-user support: Secure logins for teams or personal use
LibreChat is perfect for individuals or teams who want the power of AI, without the privacy compromises or vendor limitations.
Features of LibreChat
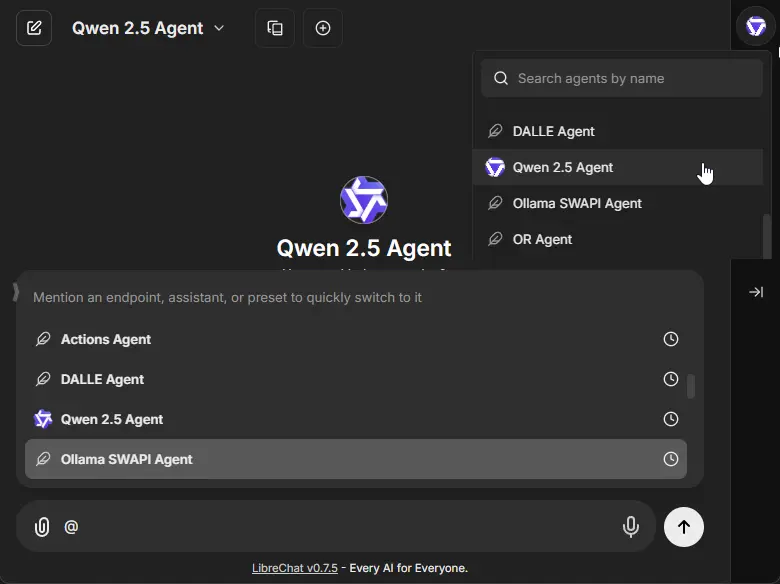
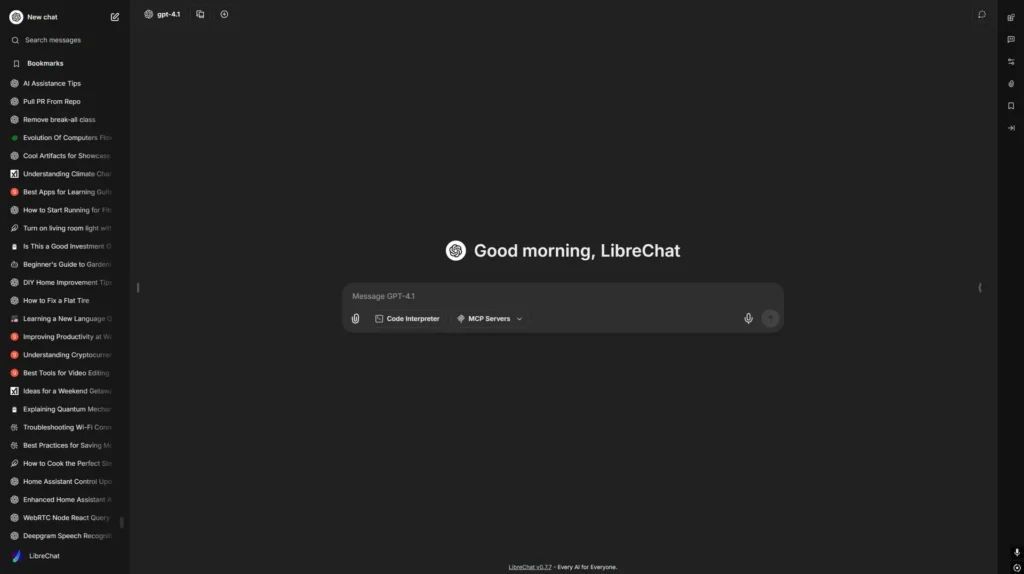
- UI & UX Inspired by ChatGPT: Clean, modern, intuitive
- AI Model Selection: Choose from OpenAI, Claude, Google, Vertex AI, Anthropic, LM Studio, Ollama & more
- Custom Endpoints: Use your own OpenAI compatible API
- File Upload & Analysis: Chat with PDFs, images, and more
- Multilingual UI: 20+ languages supported
- Speech Recognition & Audio Response: Hands-free interaction
- Secure Auth: OAuth2, LDAP, email login, multi-user access
- Agents & Tools: Custom assistants, tool integration
- Image Generation: DALL-E, Stable Diffusion, GPT-Image
- Reasoning UI: Built for advanced CoT models like DeepSeek
- Import/Export Chats: Markdown, screenshots, JSON
- Presets: Save and reuse prompts with custom models
- Web Search Integration: Live internet access for your models
- Full Open Source: Fork, extend, or contribute freely
Screenshots
System Requirements
| Platform | Requirements |
| Windows | Node.js (v18+),MongoDB, npm , Git |
| macOS | Node.js (v18+), MongoDB, npm, Git |
| Linux | Node.js (v18+), MongoDB, npm, Git |
How to Install LibreChat
Before you start: Scroll to the bottom of this page & download the latest .zip file of LibreChat.
Step-by-Step Installation Guide
1. Extract the .zip File
After downloading, unzip the file to any location you prefer:
Example: Documents/LibreChat
2. Open Terminal / CMD
Navigate into the LibreChat folder:
cd LibreChat
3. Create Your .env File
Copy the sample environment file:
On Linux/macOS:
cp .env.example .env
On Windows:
copy .env.example .env
4. Configure MongoDB
Open the .env file and set the MONGO_URI to your own MongoDB connection string.
If you don’t have MongoDB installed, you can use MongoDB Atlas or install MongoDB locally.
5. Install All Dependencies
Install all required packages with:
npm ci
6. Build the Frontend
Compile the frontend UI:
npm run frontend
7. Start the Backend Server
Launch the backend server:
npm run backend
8. Open LibreChat in Browser
Go to:
http://localhost:3080/
LibreChat will now be accessible with GPT-OSS and other models if configured properly!
9. Updating LibreChat in the Future
To pull the latest changes and rebuild:
git pull
npm ci
npm run frontend
npm run backend
How to Add GPT-OSS or Other Local AI Models to LibreChat
LibreChat supports a variety of local models like:
- GPT-OSS
- LLaMA / LLaMA 3
- Gemma
- Mistral
- OpenHermes
- WizardCoder, and more…
Here’s how to integrate them:
librechat.yaml : Tell LibreChat how to connect to Ollama
- name: "Ollama"
  apiKey: "ollama"  # just a label; no actual key needed for local models
  baseURL: http://localhost:11434/v1/  # "http://host.docker.internal:11434/v1/" if using Docker
  models:
    default: [
      "llama3",     # change to any model you want (like gpt-oss, mistral, gemma, etc.)
      "mistral",
      "gemma",
      "phi3"
    ]
    fetch: false  # true = fetch available models dynamically from Ollama (optional)
  titleConvo: true
  titleModel: "llama3"
  summarize: false
  summaryModel: "llama3"
  forcePrompt: false
  modelDisplayLabel: "Ollama"
Key things:
baseURL:host.docker.internalis needed only if LibreChat is in Docker.models.default: You can manually list the models you want, like"gpt-oss","mistral","gemma", etc.fetch: true: If set, LibreChat will automatically fetch all models available in Ollama (if thenamestarts withollama).
2. docker-compose.override.yaml : Mount your config and run Ollama
services:
  api:
    volumes:
      - type: bind
        source: ./librechat.yaml
        target: /app/librechat.yaml

  ollama:
    image: ollama/ollama:latest
    ports:
      - "11434:11434"
    volumes:
      - ./ollama:/root/.ollama  # where your models and data live
    deploy:
      resources:
        reservations:
          devices:
            - driver: nvidia
              capabilities: [compute, utility]  # for GPU acceleration (optional)
Tip: If you’re not using Docker, you don’t need to worry about the docker-compose.override.yaml. Just make sure Ollama is running locally on localhost:11434.
- Restart LibreChat:
npm run backend
- Now go to Settings > Models and you’ll see your custom model ready to chat!
For More Information about model addition and configurations, Read Official Documentation of LibreChat


