
File Information
| File | Details |
|---|---|
| Name | ComfyUI |
| Version | 2025.08 (Latest Build) |
| License | Free & Open Source (Custom MIT/Apache) |
| Platform | Windows, Linux |
| Developer | ComfyUI Community Developers |
| File Size | 300MB – 2GB (may vary with models) |
| Category | AI Image Generator, Workflow UI, Open Source Tools |
Table of contents
Description
ComfyUI is a powerful, free & open-source node-based user interface designed for creating and managing complex AI image generation workflows. It primarily supports Stable Diffusion and its extensions like LoRA, ControlNet, T2I-Adapter, and custom models, offering one of the most flexible and transparent AI art generation environments available today.
ComfyUI focuses on visual workflows, allowing users to see, build, debug, and customize the flow of their prompts, models, samplers, and pre/post-processing steps in real-time. It’s modular, fast, and incredibly lightweight, and gives you granular control over every stage of image generation.
Built with Python and running in a local environment, ComfyUI puts privacy first and performance at the center. It’s highly extensible with community-developed custom nodes and supports advanced tasks like batch processing, video frame interpolation, inpainting, depth maps, and even ControlNet chaining all with minimal resource overhead.
Whether you’re a beginner trying to learn how diffusion models work, or a power user looking to optimize complex generative pipelines, ComfyUI is one of the best tools available in the open-source AI art community.
Key Features of ComfyUI
Node-Based Workflow Editing
At the heart of ComfyUI is a modular node editor where every operation (model loading, conditioning, prompt parsing, etc.) is handled via customizable nodes. This gives you complete visibility and control over how your images are generated.
Supports Stable Diffusion, LoRA, ControlNet & More
ComfyUI isn’t limited to one model. It supports Stable Diffusion 1.5, 2.1, SDXL, along with LoRA fine-tuned models, ControlNet for pose/depth/map guidance, and even community plugins that add support for T2I-Adapter, CLIPVision, FaceID, etc.
Real-Time Debugging & Optimization
You can preview intermediate outputs, reuse loaded models across batches, and even see memory & GPU usage for each operation. This makes ComfyUI an efficient choice for professionals looking to optimize generation workflows.
Extensive Custom Node Ecosystem
The community around ComfyUI is constantly evolving. Dozens of custom nodes are available for features like image segmentation, prompt scheduling, CLIP interrogation, upscale chains, and video outputs. Just plug them in and expand functionality instantly.
Completely Offline
ComfyUI runs 100% locally. Your prompts, images, and generations never leave your machine, ensuring both privacy & better performance.
Beginner-Friendly Yet Advanced
While it may look intimidating at first, ComfyUI offers ready-made workflow files you can load and modify. New users can get started quickly, while advanced users can dive deep into customizing every detail of their generation process.
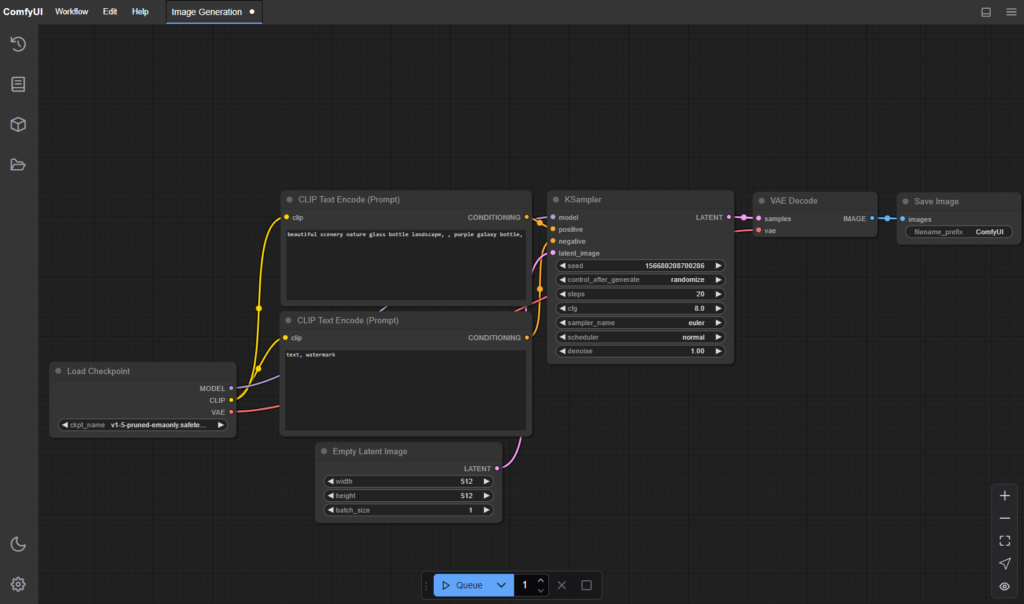
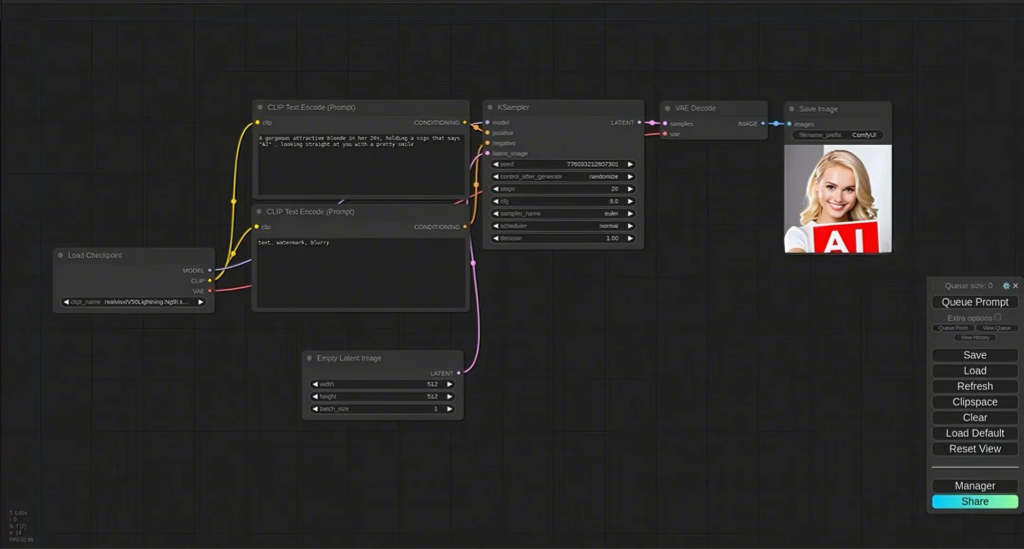
Screenshots
System Requirements
| Component | Minimum Requirement |
|---|---|
| OS | Windows 10/11 or Linux (Ubuntu preferred) |
| CPU | Quad-core processor |
| RAM | 8 GB (16 GB recommended) |
| Storage | ~5 GB (varies with model size) |
| GPU | NVIDIA GPU with 4GB+ VRAM (CUDA support) |
| Python | Python 3.10+ |
Note: AMD GPUs may require additional setup and performance may vary.
How to Install??
There are many ways to install ComfyUI , we’ll go with easiest ones, so first is direct installer files for windows and mac (.exe & .dmg) and other one is portable file for windows just extract and you’re good to go, for mac you can either download direct dmg file or clone repo and cloning repo and Comfy Cli installation is easiest and recommended , so below are all the method, choose what you prefer the most 🙂
Step 1: Download the Files
Scroll to the Download Links section at the bottom to get the latest build of ComfyUI for Windows or macOS.
Installation on Windows (.exe)
- Download the official
ComfyUI-Setup.exefile. - Double-click to run the installer.
- Follow the installation wizard to complete the setup.
- Once installed, launch ComfyUI from the desktop or Start menu.
- ComfyUI will open in your default browser at
http://localhost:8188.
Installation on Windows (Portable Build)
Step 1: Download the Portable Build
Choose the appropriate build for your GPU:
- AMD:
ComfyUI_windows_portable_amd.7z(~606 MB) - NVIDIA:
ComfyUI_windows_portable_nvidia.7z(~1.95 GB) - NVIDIA with CUDA 12.8 (for older GPUs):
ComfyUI_windows_portable_nvidia_cu128.7z
All the Downloads are from official Releases of ComfyUI github repository, so it safe 🙂
Step 2: Extract the Archive
- Use 7-Zip or similar to extract the
.7zfile. - Recommended path:
C:\ComfyUIor anywhere convenient. - If Windows blocks extraction, Right-click → Properties → Unblock before extracting.
Step 3: Add Your Models
- Place your Stable Diffusion checkpoints in:
ComfyUI\models\checkpoints - Optional: Add VAE, LoRAs, Embeddings in their respective folders (
models/vae,models/loras,models/embeddings).
Step 4: Run ComfyUI
ComfyUI_windows_portable
├── 📂ComfyUI // ComfyUI main program
├── 📂python_embeded // Independent Python environment
├── 📂update // Batch scripts for upgrading portable version
├── README_VERY_IMPORTANT.txt // ComfyUI Portable usage instructions in English
├── run_cpu.bat // Double click to start ComfyUI (CPU only)
└── run_nvidia_gpu.bat // Double click to start ComfyUI (Nvidia GPU)
- Use
--preview-method autoor--preview-method taesdfor high-quality previews.
Step 5 (Optional): Configure Extra Models
- Edit
extra_model_paths.yamlin the ComfyUI folder to add model paths from other UIs.
Installation on macOS (.dmg) (Recommended)
- Download the
ComfyUI.dmgfile from the links below. - Open the
.dmgand drag ComfyUI to your Applications folder. - Double-click to launch the app (you may need to allow it in System Preferences > Security & Privacy).
- ComfyUI will open automatically in your browser.
macOS (Manual Install)
Step 1: Install Python
- Recommended: Python 3.13
- For Apple Silicon (M1/M2), install PyTorch nightly with GPU support:
pip install --pre torch torchvision torchaudio --index-url https://download.pytorch.org/whl/nightly/cpu(Follow Apple’s Accelerated PyTorch guide for latest instructions)
Step 2: Clone ComfyUI
git clone https://github.com/ComfyOrg/ComfyUI.git
cd ComfyUI
Step 3: Install Dependencies
pip install -r requirements.txt
Step 4: Add Models
- Place SD checkpoints in
ComfyUI/models/checkpoints - Place VAE/LoRAs/Embeddings in their folders.
Step 5: Launch
python main.pyOptional flags: --preview-method taesd for high-quality previews.
Installation on Linux (Cloning Repo)
ComfyUI does not provide a one-click installer for Linux. You’ll need to set it up manually using Python. Follow this installation guide:
Step 1: Install Python (Recommended: 3.12)
ComfyUI supports Python 3.13, but it is recommended to use Python 3.12 because some community custom nodes may not yet support 3.13.
You can use pyenv or your system package manager to install Python 3.12.
Step 2: Clone the Repository
Open a terminal and run:
git clone https://github.com/comfyanonymous/ComfyUI
cd ComfyUI
Step 3: Prepare Model Directories
Make sure you place your models in the correct folders:
| Model Type | Location |
|---|---|
| Checkpoints | models/checkpoints/ |
| VAE Files | models/vae/ |
| LoRA / LyCORIS | models/loras/ (optional) |
| ControlNet | models/controlnet/ (optional) |
Step 4: Install PyTorch Based on Your GPU
NVIDIA GPUs
Run:
pip install torch torchvision torchaudio --extra-index-url https://download.pytorch.org/whl/cu128
Or, for latest (nightly) version:
pip install --pre torch torchvision torchaudio --index-url https://download.pytorch.org/whl/nightly/cu129
AMD GPUs (Linux Only)
For stable ROCm 6.3:
pip install torch torchvision torchaudio --index-url https://download.pytorch.org/whl/rocm6.3
For ROCm 6.4 Nightly (latest):
pip install --pre torch torchvision torchaudio --index-url https://download.pytorch.org/whl/nightly/rocm6.4
Intel GPUs (Windows & Linux)
Option 1 – For Intel Arc (Nightly):
pip install --pre torch torchvision torchaudio --index-url https://download.pytorch.org/whl/nightly/xpu
Option 2 – For Intel GPUs using IPEX:
- Create a Conda environment (recommended).
- Install dependencies:
conda install libuv
pip install torch==2.3.1.post0+cxx11.abi torchvision==0.18.1.post0+cxx11.abi torchaudio==2.3.1.post0+cxx11.abi intel-extension-for-pytorch==2.3.110.post0+xpu --extra-index-url https://pytorch-extension.intel.com/release-whl/stable/xpu/us/ --extra-index-url https://pytorch-extension.intel.com/release-whl/stable/xpu/cn/
For more GPU compatibility info, visit PyTorch Installation or Intel documentation.
Step 5: Install ComfyUI Dependencies
In the ComfyUI directory, run:
pip install -r requirements.txt
Step 6: Launch ComfyUI
Finally, run:
python main.py
Then open your browser and go to:
http://localhost:8188Installation for Linux (ComfyCLI)
Prepare Your System
1. Check Python
ComfyUI needs Python 3.9 or higher.
python3 --version
If Python isn’t installed or the version is too low, install it using the command for your Linux distribution:
Ubuntu / Debian:
sudo apt update
sudo apt install python3 python3-pip python3-venv
CentOS / RHEL:
sudo yum install python3 python3-pip
Fedora:
sudo dnf install python3 python3-pip
Arch Linux:
sudo pacman -S python python-pip
2. Install Git (if missing)
# Ubuntu / Debian
sudo apt install git

# CentOS / RHEL
sudo yum install git

# Fedora
sudo dnf install git

# Arch Linux
sudo pacman -S git
3. Create and Activate a Virtual Environment (Recommended)
This avoids conflicts with other Python packages.
# Create a virtual environment
python3 -m venv comfy-env

# Activate it
source comfy-env/bin/activate
Each time you use ComfyUI, activate this environment first.
To exit it later:
deactivate
Step 2: Install Comfy CLI
Once your environment is active, run:
pip install comfy-cli
(Optional) Enable command-line auto-completion:
comfy --install-completion
Step 3: Install ComfyUI
Now install ComfyUI using one simple command:
comfy install
This will:
- Download the latest version of ComfyUI
- Install ComfyUI-Manager (node manager)
- Set up the default workspace
Other install options:
# Default location (~ /comfy)
comfy install

# Custom install directory
comfy --workspace=/path/to/your/workspace install

# Update existing ComfyUI in current directory
comfy --here install

# Work with last used ComfyUI
comfy --recent install

# Install without manager
comfy install --skip-manager
Check where ComfyUI is installed:
comfy which
comfy --recent which
comfy --here which
Step 4: Add GPU Support (Optional)
For NVIDIA GPUs (CUDA):
pip install torch torchvision torchaudio --index-url https://download.pytorch.org/whl/cu124
For AMD GPUs (ROCm):
pip install torch torchvision torchaudio --index-url https://download.pytorch.org/whl/rocm6.0
For CPU only:
pip install torch torchvision torchaudio --index-url https://download.pytorch.org/whl/cpu
(Check the official PyTorch website for commands matching your CUDA/ROCm version.)
Step 5: Launch ComfyUI
After installation:
comfy launch
By default, it runs at → http://localhost:8188
Common launch options:
# Run in background
comfy launch --background

# Set custom IP and port
comfy launch -- --listen 0.0.0.0 --port 8080

# Run in CPU mode
comfy launch -- --cpu

# Low VRAM mode
comfy launch -- --lowvram

# Stop background instance
comfy stop
Download Comfy UI Free & Open Source Node-Based Workflow UI for AI Image Generation with different models
Conclusion
If you want to run AI models in your system locally without complex setups and want fast results then ComfyUI is a must have software for you, it is one of the most loved Node-Based AI Workflow Tool by developers as well as AI enthusiast, you should definetely try this if you wanna run AI models that generate Images & Videos locally. Enjoy!


