
Imagine a tool that can transform a single image into a fully-realized 3D model in just seconds. Microsoft has released something that’s turning heads in the 3D & AI world, its named TRELLIS.2
It is an open source AI model that can take any image & turn it into a high-quality, fully textured 3D mesh. We’re talking about a complete 3D asset with physically based rendering (PBR) materials like color, roughness, metallic surfaces, even transparency, all generated automatically.
What makes TRELLIS 2 truly special is its innovative approach. While most 3D AI models struggle with complex geometries, Microsoft’s researchers developed a groundbreaking voxel-based representation called O-Voxel that handles intricate details with ease. Thin structures, open surfaces, hidden details, the kinds of things that typically make 3D modeling software break down are now handled smoothly and elegantly.
But here’s the catch, if you’ve peeked at the official setup, you’ve probably noticed it’s not exactly beginner-friendly. With complex research repositories, massive model files, & installation steps, getting TRELLIS 2 running can feel like solving a complicated puzzle especially if you’re not a hardcore tech enthusiast with enterprise-level hardware.
That’s exactly why guides like this exist. In this guide, we’ll walk through the easiest way to install and run TRELLIS 2 locally using ComfyUI, step by step, so you can start generating 3D models from images without unnecessary complexity.
Before You Start (Quick Checklist)
Make sure your system meets these requirements:
- OS: Windows or Linux
- Python: 3.10 or newer
- GPU: NVIDIA CUDA-compatible GPU
- Minimum: 8GB VRAM (will work but slow)
- Recommended: 16GB+ VRAM
- PyTorch: 2.0+ (handled automatically by ComfyUI)
- Disk Space: ~20–25GB free (models download on first run)
TRELLIS.2 currently requires NVIDIA GPUs. AMD is not supported.
Step 1: Install and Launch ComfyUI (Portable Recommended)
To keep things simple and avoid breaking any existing setups, we’ll use the portable version of ComfyUI. This runs in its own folder and won’t interfere with your current Python environment or workflows.
Choose the Right Portable Build
Recommended for most users
- ComfyUI_windows_portable_nvidia_cu126.7z
Stable and compatible with most NVIDIA GPUs
Advanced users only
- ComfyUI_windows_portable_nvidia_cu128.7z
Use this only if your system already supports CUDA 12.8 without issues
Important: Backup Your Existing ComfyUI (If Any)
If you already have ComfyUI installed:
Extract the portable version into a separate folder, Do not overwrite it
Install and Launch
- Download the selected ComfyUI portable archive
- Extract it to a new folder (Extract using 7-Zip Recommended)
- Run ComfyUI once to make sure everything works
- Open your browser and go to:
http://localhost:8188
Wait until ComfyUI fully loads before moving on to the next step.
Step 2: Install ComfyUI Manager (Portable Version)
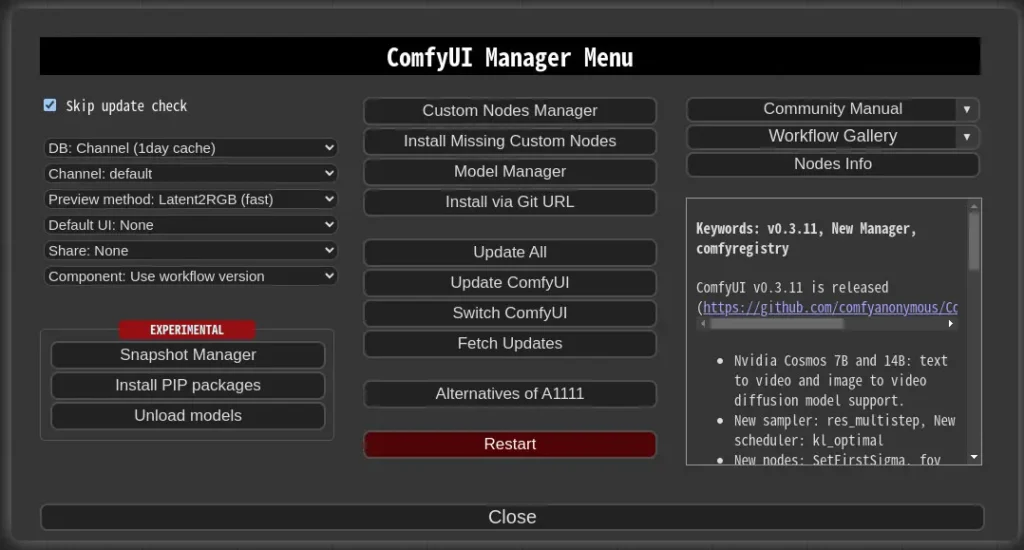
To install TRELLIS 2 easily, we’ll use ComfyUI Manager, which allows you to install custom nodes directly from the UI. Since we’re using the portable version of ComfyUI, the manager needs to be installed slightly differently.
2.1 Install Git (Required)
ComfyUI Manager relies on Git, so make sure it’s installed first.
- Download Git for Windows from:
https://git-scm.com/download/win - Choose the Standalone Installer
- During installation, select:
“Use Windows default console window” - Complete the installation with default options
Once Git is installed, restart your system if prompted
2.2 Download the Manager Install Script (Portable Only)
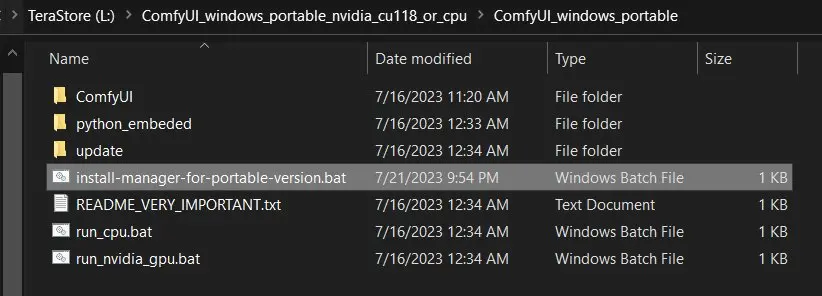
- Install ComfyUI Manager Directly using
batfilescripts/install-manager-for-portable-version.bat - Don’t left-click the file above
- Right-click the file → Save As…
- Save it directly inside your portable ComfyUI folder
(for example:ComfyUI_windows_portable/)
Make sure the .bat file is placed in the root ComfyUI portable directory, not inside subfolders You can see the Screenshot above.
2.3 Run the Installer
- Launch ComfyUI again
- Open
http://localhost:8188 - You should now see a Manager button in the interface
Once the Manager is visible, you’re ready to install TRELLIS 2 in the next step.
Step 3: Install ComfyUI-TRELLIS2
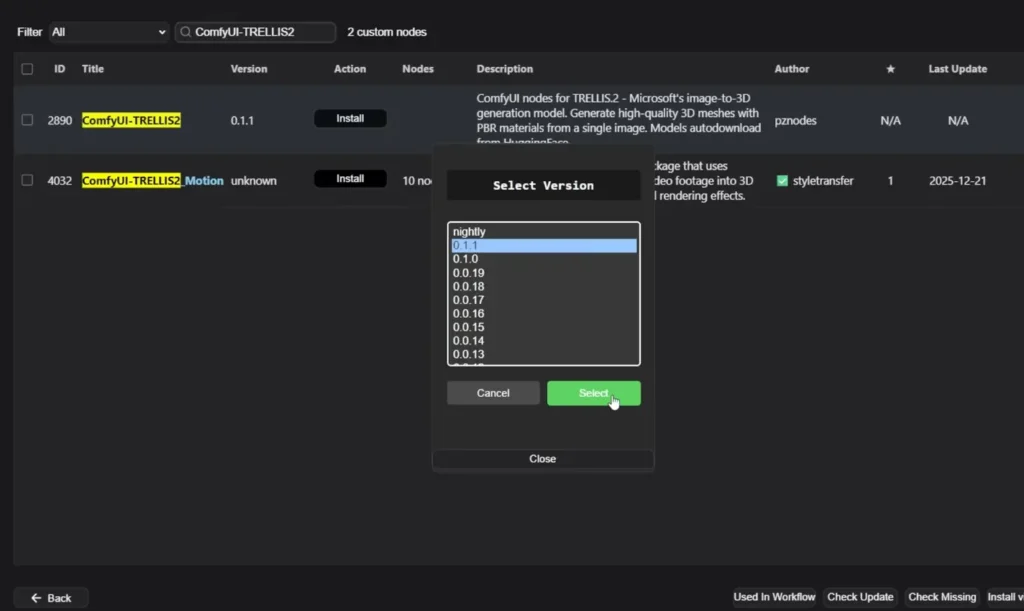
- Open ComfyUI Manager -> Custom Nodes Manager
- In the search bar, type:
ComfyUI-TRELLIS2 - Click Install
- Select the latest version
- Wait for the installation to complete
- Restart ComfyUI
That’s it, Its that simple!
Step 4: Allow Dependency Installation (Important)
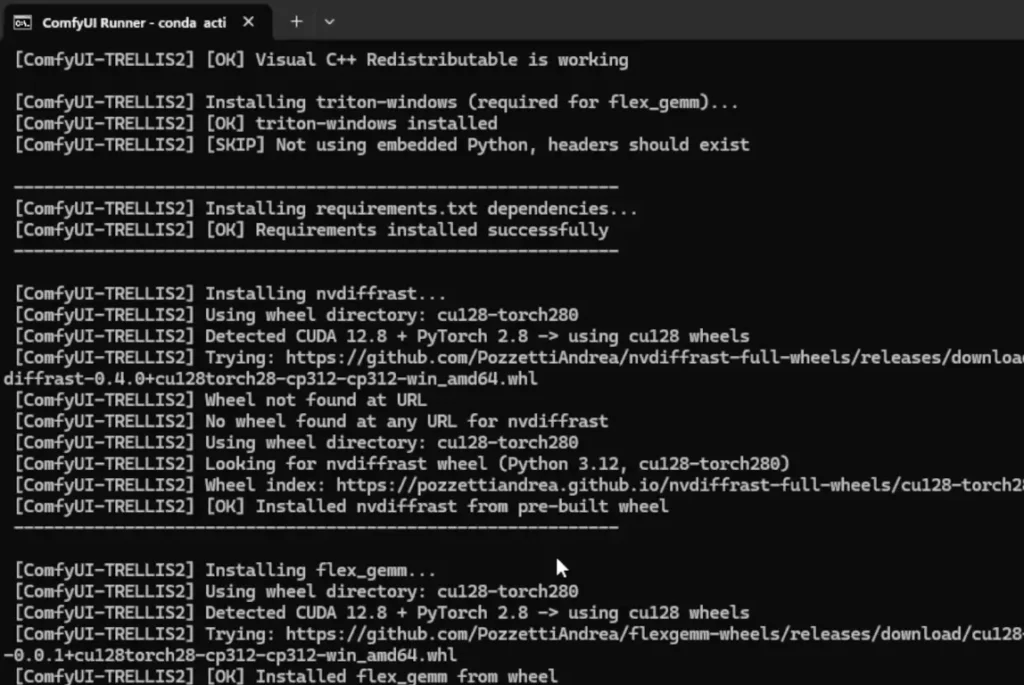
During installation or first launch:
- Windows may ask permission to run scripts
- Click “Allow” when prompted
Behind the scenes, the installer:
- Detects your CUDA version
- Installs required 3D libraries
- Automatically installs Flash Attention (if compatible)
- Selects the correct wheels for your GPU
This step is crucial, let it finish.
Step 5: Refresh ComfyUI and Load Example Workflows
After restarting ComfyUI:
- Right-click -> New Workflow
- Open the TRELLIS.2 example workflows
- Drag one into the canvas
(e.g. geometry_only or geometry_texture)
The custom node includes ready-to-use demo workflows.
Step 6: First Run: Model Downloads
On the first execution, TRELLIS.2 will:
- Download large model files from HuggingFace
- Fetch files based on your selected resolution
(e.g. 512 or 1024 cascade) - Show download progress in the terminal window
This is normal and can take several minutes.
Models are downloaded automatically, manual downloads are only needed if something fails.
Step 7: Fix Common First-Run Errors (If Any)
If you encounter any error like ModuleNotFoundError: pyrender
This is a known first-run issue & it may and may not occur so you can skip this step if it didn’t occur
Fix:
pip install pyrender
Then restart ComfyUI and rerun the workflow.
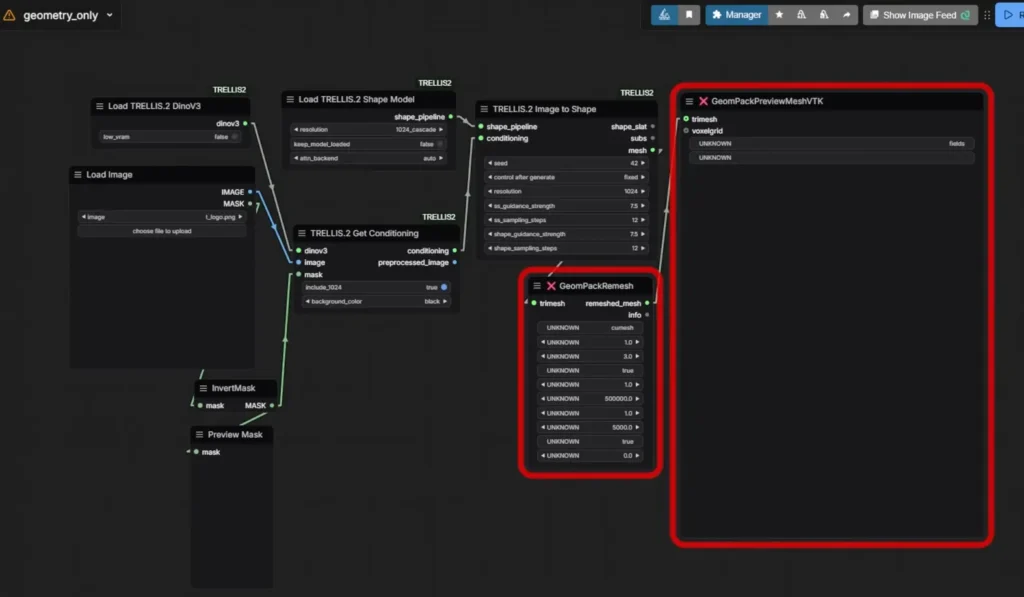
Missing 3D Preview or Render Node
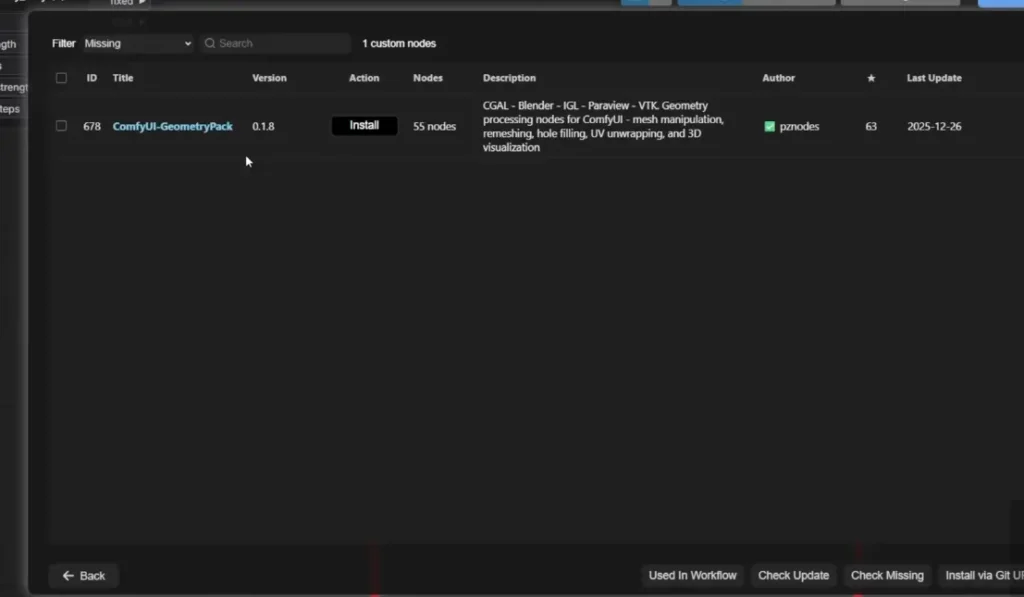
Some example workflows rely on extra render nodes.
Fix:
- Open ComfyUI Manager
- Click Install Missing Custom Nodes
- Install the suggested node pack
- Restart ComfyUI
After this, red error boxes should disappear.
Step 8: Run Your First Image to 3D Generation
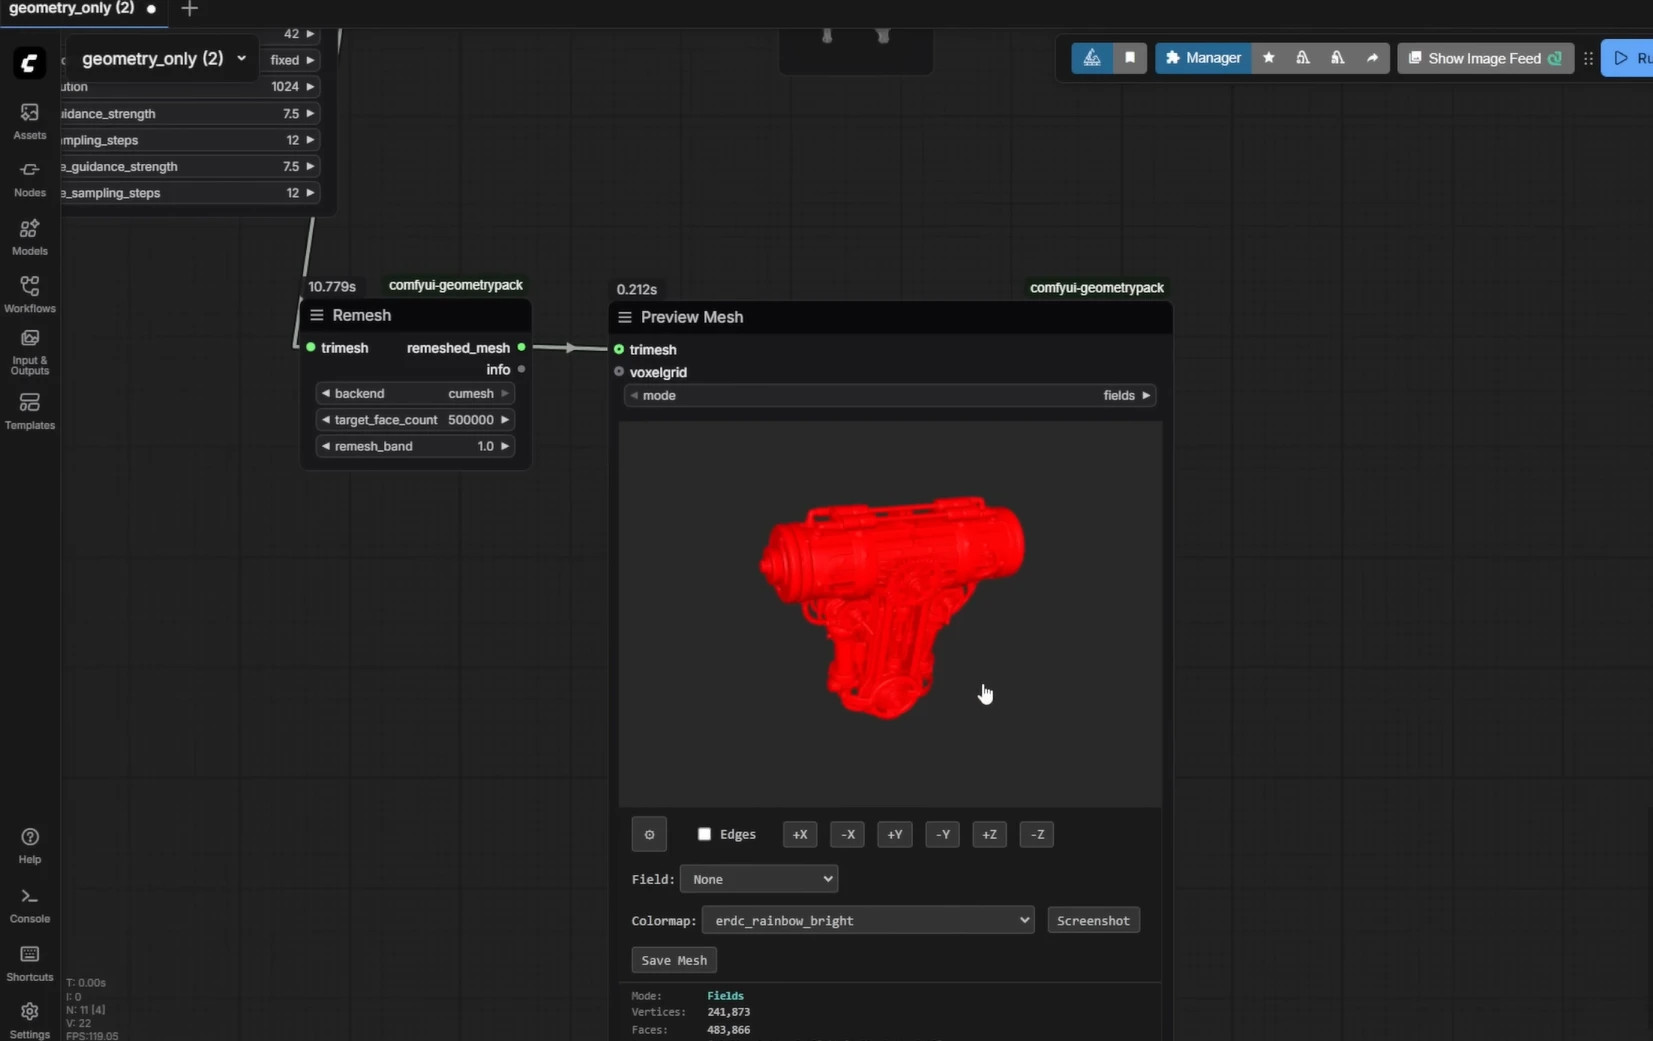
Once everything is installed:
- Load an example image (or use the provided ones)
- Run the workflow
- Watch the terminal for:
- Flash Attention activation
- Shape model sampling
- Texture model processing
- Preview the generated 3D mesh inside ComfyUI
- You can also save the mesh
Similarly You can use other workflows too, at first they will download the dependencies and then you can generate your 3D models
Conclusion
TRELLIS 2 is super cool. Microsoft just made 3D design way easier. With just one picture, you can now create a full 3D model that looks amazing. No more spending hours trying to build things by hand.
If you’ve got a good graphics card and some tech spirit, you can turn any image into a 3D thing in minutes. It’s like magic for creators, designers, and anyone who loves making stuff. The best part? It’s free and open for everyone to use. It’s the future of making 3D things.


